We can't find the internet
Attempting to reconnect
Something went wrong!
Hang in there while we get back on track
-
Chapter 1 Platform Setup
-
1.1Architecture Overview02:37
-
1.2Configuring Storage02:40
-
1.3Provisioning Storage04:18
-
1.4Configuring the Compute Cluster08:57
-
1.5Provisioning the Compute Cluster05:19
-
1.6Destroying the Compute Cluster03:25
-
-
Chapter 2 Operating the Platform
Don't have an account?
Sign up and get a 30 day free trial. No credit card required.
Configuring the Compute Cluster
Now that we've got storage provisioned, let's take a look at setting up our compute cluster. In this episode we will setup the networking, compute and database. This will be a single node setup that's good for starting out.
We will discuss scaling in a future episode where we will take this compute cluster and add more nodes to it.
Adding the network block
The network block sets up the VPC and is the foundation layer of our infrastructure. You can simply select the base network for AWS and click the Add button.
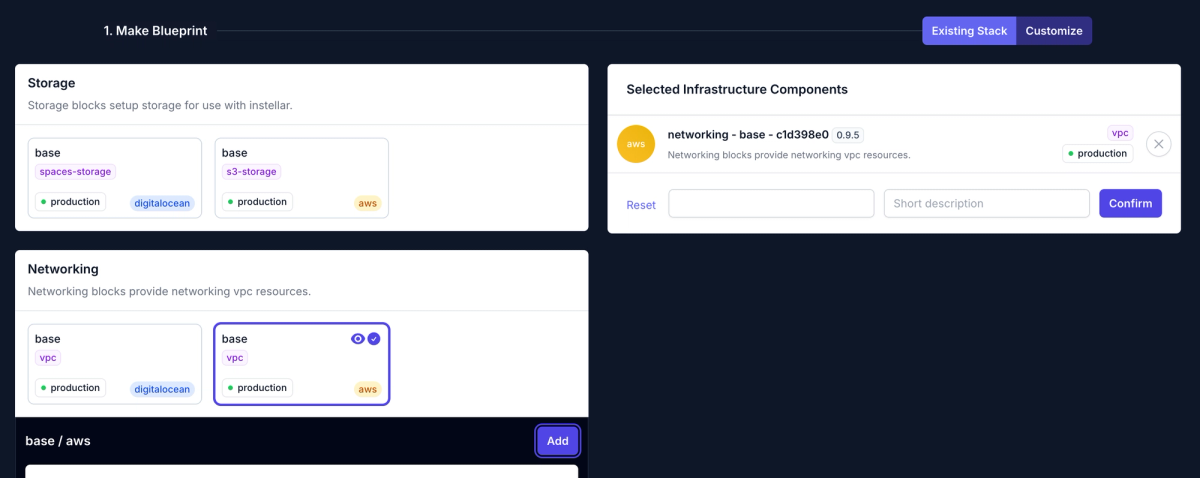
This is all we need to do to setup the foundation of our infrastructure. Out of the box this sets up 3 availability zone for us. This means if we want to do multi-zone deployment in the future it'll be easy.
variable "identifier" {}
module "aws_networking_milkyway_fgh" {
  source  = "upmaru/instellar/aws//modules/network"
  version = "0.9.5"

  blueprint           = var.identifier
  identifier          = var.identifier
  public_subnet_cidrs = ["10.0.1.0/24", "10.0.2.0/24", "10.0.3.0/24"]
  region              = var.aws_region
  vpc_ip_range        = "10.0.0.0/16"
}
Compute block
Next we'll need to add the compute to the networking layer. Simply select the compute block you want to use and click the Add button.
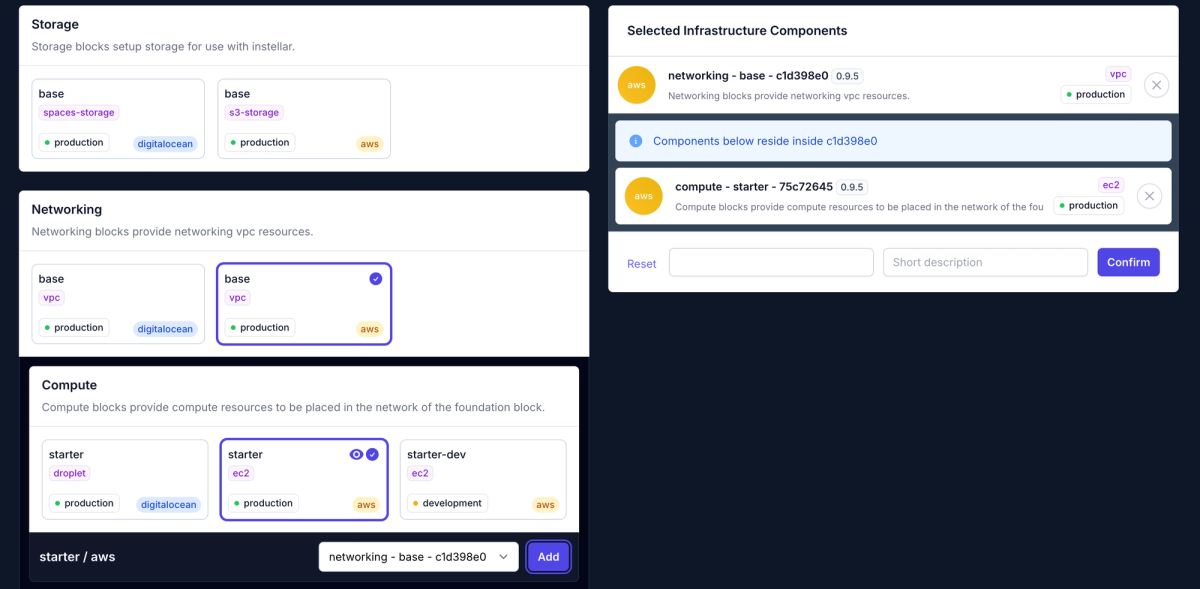
This will setup a multi-node cluster, by default it will setup a 3 node cluster. If you wish to change this you can adjust the cluster_topology field.
For this case we will remove the 2 extra nodes since we're going for a single node setup.
module "aws_compute_milkyway_prz" {
  source  = "upmaru/instellar/aws"
  version = "0.9.5"

  balancer                     = false
  balancer_deletion_protection = true
  balancer_ssh                 = true
  bastion_size                 = "t3a.micro"
  bastion_ssh                  = true
  blueprint                    = var.identifier
  cluster_topology = [
  ]

  global_accelerator   = false
  identifier           = "milkyway-prz"
  network_dependencies = module.aws_networking_milkyway_fgh.dependencies
  node_detail_revision = 1
  node_size            = "t3a.medium"
  public_subnet_ids    = module.aws_networking_milkyway_fgh.public_subnet_ids
  publicly_accessible  = true
  region               = var.aws_region
  ssh_keys             = ["zack-studio"]
  ssm                  = true
  storage_size         = 40
  volume_type          = "gp3"
  vpc_id               = module.aws_networking_milkyway_fgh.vpc_id
  vpc_ip_range         = module.aws_networking_milkyway_fgh.vpc_ip_range
}
Database block
Let's add the database block to the networking layer. Select the database block you want to use and add it to the networking layer.
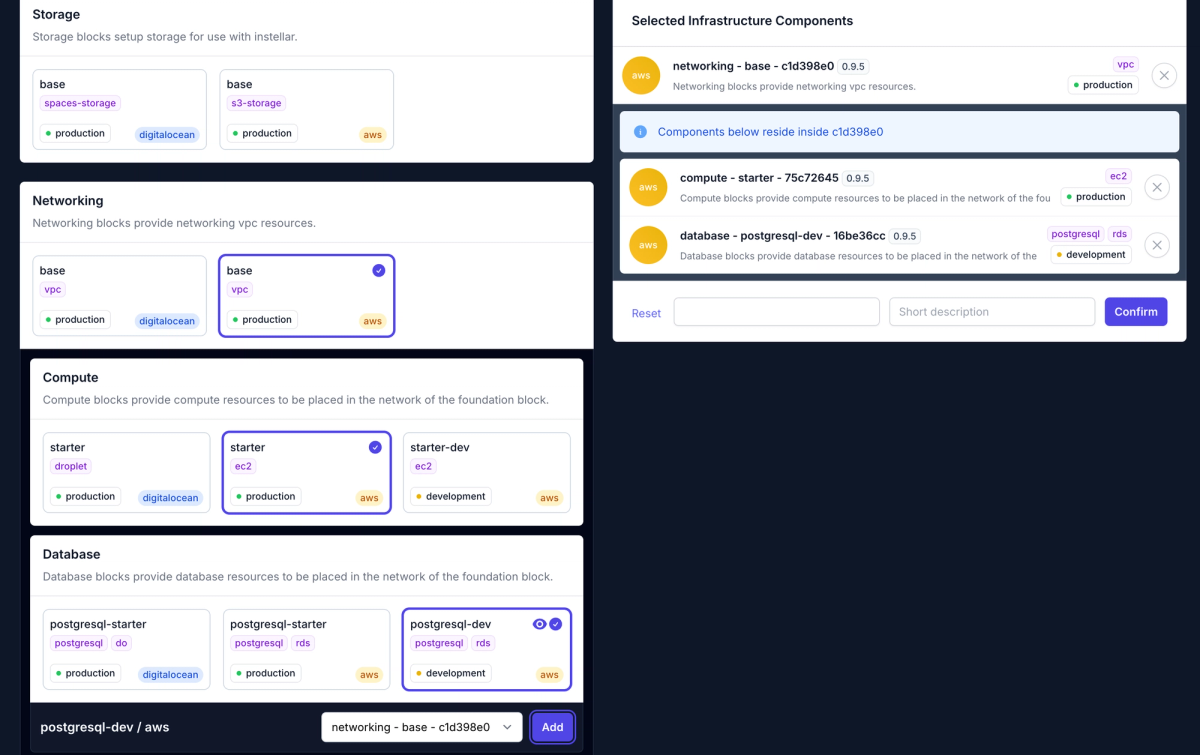
Adding this block will automatically setup all the connectivity and ensure that the compute cluster has access to the database.
Database connectivity
You'll notice that the code generator automatically added the compute cluster security group ids to the security_group_ids field of the database. The bastion node also has access, you can remove this access by customizing the security_group_ids field as you see fit.
Giving the bastion access to the database can offer some conveniences like allow you to use a gui like table plus to connect to your database. For sandbox environment this might be desired, but for production environment you can remove bastion access from the database if that's required by your security policy.
module "aws_database_milkyway_ssa" {
  source  = "upmaru/instellar/aws//modules/database"
  version = "0.9.5"

  blueprint                     = var.identifier
  db_name                       = "instellardb"
  db_size                       = "db.t3.small"
  db_username                   = "instellar"
  deletion_protection           = false
  engine                        = "postgres"
  engine_version                = "15"
  identifier                    = "milkyway-ssa"
  manage_credential_with_secret = false
  nodes_iam_roles = [
    module.aws_compute_milkyway_prz.nodes_iam_role
  ]
  port   = 5432
  region = var.aws_region
  security_group_ids = [
    module.aws_compute_milkyway_prz.nodes_security_group_id,
    module.aws_compute_milkyway_prz.bastion_security_group_id
  ]
  skip_final_snapshot = true
  subnet_ids          = module.aws_networking_milkyway_fgh.public_subnet_ids
  vpc_id              = module.aws_networking_milkyway_fgh.vpc_id
}
Links
The links.tf contains automatically generated resources that will integrate the database and compute to Opsmaru. It enables automation and allows opsmaru to have visibility into the infrastructure.
module "instellar_link_milkyway_fhn" {
  source  = "upmaru/bootstrap/instellar"
  version = "0.8.1"

  balancer              = module.aws_compute_milkyway_prz.balancer
  bootstrap_node        = module.aws_compute_milkyway_prz.bootstrap_node
  cluster_address       = module.aws_compute_milkyway_prz.cluster_address
  cluster_name          = module.aws_compute_milkyway_prz.identifier
  insterra_component_id = 468
  kit_slug              = "lite"
  nodes                 = module.aws_compute_milkyway_prz.nodes
  password_token        = module.aws_compute_milkyway_prz.trust_token
  provider_name         = "aws"
  region                = var.aws_region

}

module "instellar_link_milkyway_jrr" {
  source  = "upmaru/bootstrap/instellar//modules/service"
  version = "0.8.1"

  certificate = module.aws_database_milkyway_ssa.certificate_url
  channels    = ["develop"]
  cluster_ids = [
    module.instellar_link_milkyway_fhn.cluster_id
  ]
  credential = {
    host     = module.aws_database_milkyway_ssa.address
    password = module.aws_database_milkyway_ssa.password
    port     = module.aws_database_milkyway_ssa.port
    resource = module.aws_database_milkyway_ssa.db_name
    username = module.aws_database_milkyway_ssa.username
    secure   = true
  }

  driver                = "database/postgresql"
  driver_version        = module.aws_database_milkyway_ssa.engine_version
  insterra_component_id = 469
  provider_name         = "aws"
  slug                  = module.aws_database_milkyway_ssa.identifier
}
Customizations
You can customize the settings using the blueprint editor ui as you see fit. Once you make the changes you will be prompted to update the repository and the changes will be propagated as pull requests in your github repository.
Instructor

Zack Siri
Founder
Zack is the creator of Opsmaru. He's worked as CTO in many companies across many industries, everything from hospitality to fin-tech.
He's currently building Opsmaru and loves help customers simplify their DevOps journey. He's happy to share his knowledge and experience to empower customers to get the most out of Opsmaru.